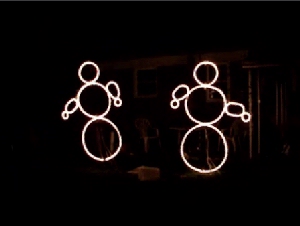
 These are two snowmen will be having a snowball fight across the street into our neighbors yard. Both wireframes are wrapped with rope lighting to make them show up at night. There arms are animated to look like they're moving. Select the picture, it's a link to a short video. This video was done during a preliminary test.
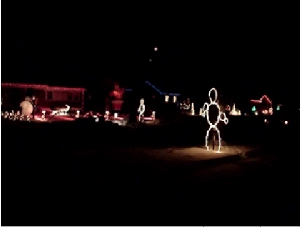 This is a video of the snowmen having a snowball fight over the street. It looks great as your driving down the street. A few visitors missed the fact that it was even there. They were so worried about finding the house that when they go there they were too close to get the whole effect. Also I located the snowmen so that you could see one from each direction. Kind of like they sere trying to hide behind the tree.
 This is a link to a dimensional drawing I made at lunch one day to calculate the amount of wire I needed to buy. It took 1500' of wire. In the center of the street it is 21 feet off the street. At the lowest point near the edge of the street the lowest snowball is just over 14' so I don't think any will get hit by trucks.
 The wire harness is made with 18 awg wire which is more than adequate for the loads required. The longest runs is 100 feet. Each part of the snowball fight needed a separate hot wire so the parts can be turned on one part at a time. So to create the effect of snowballs flying I wrote the program to turn each ball on and off sequentially.
 Each ball is dropped down from the main wiring harness with spt1 wire. at the end of each drop is a female plug. Plugged into this is a string of 100 lights balled up and wire tied. This will allow the ball to break free if something strikes it.
 This is the first bend of a whole bunch to make up the snowmen. This bend will continue all the way around to make up the 34" lowest circle of the snowmen.
 This is a 1/2" EMT conduit bender. It actually works pretty good for 1/4" rod. I created all the big rings of the Snowmen with it. The smaller rings like the head and the arms were made in a vise with my hands. By gently making small repeated bends forming a complete circle.
 After forming all the rings. They were welded at the ends, forming solid rings. Then after all the rings are done. The finished rings were then assembled into snowmen simply by welding them together. For support and anchoring I welded the snowmen's bodies to an eight foot steel fence post. The snowmen being 80" tall allow the post to be pushed into the ground about 14".
 This is a completely welded snowman ready for paint.
 Here's a picture of both snowmen ready for paint. Notice one's right handed and the other left.
 After all the painting is done propelling needs to be attached. This is easy to do with wire ties. Make sure to use plenty of them and try not to cover the individual bulbs inside the ropelight with them. I install the roplight when powered up so I can see the bulbs easier. Ropelight can only be cut every 18". this is because the bulbs use a voltage smaller than 120 VAC. So they are wired in groups of bulbs wired in series. These groups of bulbs end up being 18" long. If you cut at the wrong spot you will disable that 18" section of lights. On ropelight the area to cut is distinguished by where the start of one group and the end of the last group of bulbs is attached to the main power lines that run the entire length of the ropelight. Clear ropelight is the easiest to see these connections. They will be darker wires wrapped around the mains.and they will be 1" apart. So cut the rope light between these internal connections and both pieces will still work.
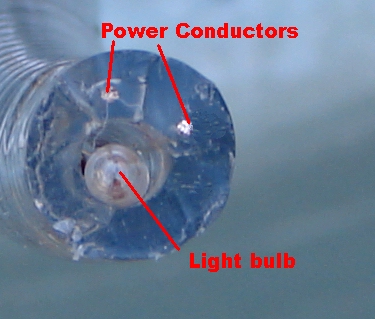 To connect ropelight to a power source a two pole power cord is used. The female end is cut off and then the leads separated and stripped back 5/8". Then the ends of the wire are tinned with solder. Also don't forget to slide a piece of 1/2" shrink tube down the power cord. Then the end of the ropelight is cleaned up with a razor knife if necessary. Notice the picture to the right. There is a hollow through the middle of the ropelight where the light bulbs reside. There are also two conductors running down the one side . These conductors are the power conductors for the entire length of the ropelight.
 To connect the tinned power cord to the ropelight push a scratch awl or large diameter ice pick "straight" down each of the conductors. As soon as the Awl is removed push in the stripped end of the power cord conductor until the insulation touches the ropelight. Then repeat for the other conductor. make sure there are no wires close to touching or they WILL short out. after the connections are made slide the shrink tube back up the power cord and over the ropelight at least 3/4" . When the shrink tube is in position squirt a small amount of silicone caulk into the shrink tube near the ropelight. Then shrink the tubing thoroughly so it is snug to the ropelight and the power cord.